Kitchen & Bathroom
Replacing the knobs in your Kitchen and bathroom
Regardless of whether you are a DIY individual or not, the easiest and fastest way to give your kitchen and bathroom a quick makeover is by replacing your current knobs with these absolutely gorgeous glass knobs.
This is the fastest and easiest way to give your kitchen and bath a makeover.
You will just need a few materials to do both of this DIY project:
1. Classy Glass Cabinet Knobs
2. Nuts and screw driver
3. Drill
4. A Single color paint of your choice
5. Sand Paper
The pictured of the glass knobs we used for both the projects is given below:

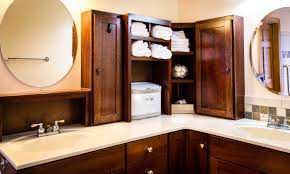
Bathroom
Bathrooms are an important part of our life, research even shows that a certain portion of our lifetimes is spent in the bathroom. So, having a nice and tidy bathroom will not be that bad, right? At least for me it is a must to have my bathroom look gorgeous as rest of my home.
We will try to update the vanity that stay inside your bathroom. It is the rule of thumb to pain first and then change your desired part of the furniture. Since, it is a smaller furniture, and it might have some glass on the small doors, it should not take us more than a few hours.
You need to renovate your washroom, however you would prefer not to use up every cent, and that is an unmistakable probability with any home remodel venture.
Before we start the paint we first need to prep our cabinets for painting.
The Bathroom could like this:
The steps are as follows:
· If you intend to supplant the vanity best and sink, evacuate these also for less demanding access and less covering later.
· If the cabinet has working drawers, expel them from the cabinet.
· Then unscrew the cabinet fronts, where conceivable, and complete them independently.
· Use trisodium phosphate (TSP) and a cleaning cushion or wipe the surfaces to be painted.
· Rinse no less than twice with new water and a wipe.
· For wood surfaces secured by an unmistakable complete, sand with 220-coarseness sandpaper to evacuate any shine.
· Reach into within corners of the cabinet boards and openings of any embellishment.
· For already painted surfaces, evacuate any free or harmed paint.
· Sand to plume the edges of the paint with the exposed wood and apply a latex groundwork to the uncovered spots.
· For melamine or thermofoil-secured surfaces regular on cabinet sides and a few entryways, watch that the plastic film is immovably clung to the material underneath.
· If not, consider evacuating the majority of the film by utilizing a warmth weapon to relax the glue.
· After the film is gone, utilize a cloth with liquor or mineral spirits to wipe off the cement.
· If the film is attached to the support, sand it delicately with 220-coarseness sandpaper until the point that the surface ends up dull.
· For all surfaces, vacuum any sanding dust and wipe the surfaces clean with a delicate soggy material.
· Use painter’s tape to cover off the underside of the vanity top, bordering dividers, floor and within face of the cupboard outline.
Paint First!
Painting on a plane surface is quite easy. If you do not like the color of your kitchen cabinets, one coat of paint can make all the difference.
1. Before any painting job, you need to remove all the connectors of the cabinet and remove all the knobs.
2. The surface of the hardware needs to be clean. So, clean it thoroughly. It is easier to put primer on a wooden base, so, it should not be a problem for you.
3. Always remember to paint in the same direction, do not start zigzag styles. Give the strokes from one direction only.
After you are done with the painting, you need to dry them for a couple of hours and then it should be ready again!
There are a few steps to follow and you will give your bathroom vanity face lifting just by replacing with glass knobs.
How to Change the knobs- A Step-by-Step guide:
After the pain is dried, we will be changing the knobs now. Steps are explained for your easy understanding. Let us the see the steps below-
Replace the old one- Begin by pulling the screws from the doorknob. The screws will be arranged within the door. If your doorknob has screws on the cover plates, clear those to discharge the old handle. If not, look for a touch of opening with a metal piece for the handle. By then, use a catch or the key from the new doorknob to push in on the metal piece as show in the photo. That should influence the doorknob to extricate up.
Dispose of the Plate-Attract off the doorknob to reveal the plate underneath. Scan for a space in the plate along the wrinkle where it rams into the passage. Wedge a flathead screwdriver in the space and after that give the plate a half swing to pop it off.
Evacuate the Old Screws-Subsequent to expelling the plate, you’ll see the screws you ought to oust with a power enter. Remove the old snare by taking out the screws with a power infiltrate or screwdriver.
Introduce the New Glass handles– Contingent upon your entryway; you may need to change the backset, the separation between the edge of the entryway and the focal point of the doorknob. Most doorknobs can suit distinctive backsets.
Now do the steps backward to attach the new glass knobs. As a rule, the gaps for the new doorknob will coordinate your current openings. In the event that it doesn’t coordinate, you have to put some wood putty before the paint session.
Sink the new lock, setting the screws by hand first and afterward fixing them with a power bore. Set the doorknobs set up, set the screws by hand, and after that fix. Don’t over-fix the screws or you’ll tie the doorknob.
Now, test the knobs and see if it locks in the right direction.
Some tips for you to keep your bathroom clean.
1. It will never influence molds of any sort to develop if you can keep your shower dry. Hang a wiper over the showerhead and make it a choose that the last one to tidy up wipes down the dividers, tub, and shower gateways. A couple extra minutes of work can really confine cleaning time as time goes on.
2. You can use EnduroShield or RainX. They help water, minerals, and chemical foulness globule up and continue running off, so there is less for you to scour away.
3. Utilize a liquid chemical with a pump or an even sans hands cleaning agent allocator. Taking out the foul chemical dish with empower your sink and edge to stay more clean.
4. On the remote possibility that you submit spots for magnificence mind items and hair devices in your answer authority or vanity, they can be can be covered yet remain inside reach. A chaos free counter in a brief instant impacts a restroom to look and feel more clean.
5. Towels will dry much more quickly and your washroom will look tidier when you hang them over a bar. No divider space? Consider an over-the-passage towel bar or catches.
6. You will find different cleaners in the market; pick the one that you by and large use. These formulas help sinks, tubs, and toilets restrict stains for up to seven days.
7. You can use them once more. Truly, to quickly and easily get hair and clean bunnies from the floor without dragging out the vacuum cleaner, the dryer sheets will spare you from dragging the vacuum cleaner each time it happens.
Kitchen:
Now comes the kitchen. Follow the previous steps for kitchen as well. But you might want to order food from outside, for a couple of days, because this project is going for longer times. So paint first, and then change the knobs. That is the rule. Now, all of us use kitchen for two of the most important purposes-
· Preparing food
· Eating that food
The kitchen might look like this:

So, the hygiene of a kitchen should be a priority for every household. On more than one occasion a year it’s a decent and fundamental thing to burrow profound and extremely clean your kitchen. Be that as it may, shouldn’t something be said about day by day upkeep? The stuff you can wrap up of the year to keep your kitchen spotless and pleasant?
The after image:

1. Unfilled dishwasher-This is such a basic, however keen proposal. Ensure your dishwasher and your sink are void before you begin cooking; along these lines, you can wash and load untidy instruments and dishes immediately as opposed to forgetting them to sit for a couple of hours (or overnight, or days!).
2. Clean while working– With a vacant dishwasher and sink toward the beginning of your supper prep, cleaning as you go all of a sudden gets a great deal simpler!
3. Wash your sink after you wash the dishes- Numerous individuals wash their kitchen sink with Mrs. Meyer’s basil cleanser and warm water after each dishwashing session. It’s a fairly alleviating, fulfilling minimal custom, and it keeps the sink clean and noticing great. It’s a cleaning propensity that is useful for the kitchen, and it influences me to feel great as well. In addition, dishes don’t get additional oily or gunky as they sit in the sink, sparing you time when you discover up on the cleaning up. Win-win!
4. Do some work monthly- Need to clean consumed on stains and expel rust spots from your stainless steel pots and container? Or on the other hand simply expel stains and clean? Perhaps your blades have gotten somewhat corroded or spotty, and you need to get them glossy and new once more, or they should be sharpened. Once a month it’s a smart thought to assess these things and address any issues previously they gain out of power and take an entire evening to address.
5. Oil your cutting sheets once per month-On a similar note, all it takes is five minutes a month to keep up your wooden cutting sheets. You can likewise do this for your wooden spoons! This spares time and cash; you’ll supplant these things considerably less frequently on the off chance that they are looked after.
6. Get the correct cleaning instruments- There is nothing more baffling than preparing to complete a touch of cleaning or upkeep work just to be frustrated on the grounds that you either don’t have the correct apparatus, or you need to circled your home discovering it. Then again, you most likely need not bother with 10 distinctive kitchen cleaners obstructing your under-sink space. Pare down to the fundamentals and after that store them perfectly under the sink or in a bureau, you can without much of a stretch access.
7. Keep your Countertops clear- Even countertop that have pretty things, however just excessively numerous of them! — can influence a kitchen to feel messy and claustrophobic, though for the most part clear ledges are stimulating and moving. They likewise welcome you to cook, rather than feeling like your kitchen is unready for you. Take a stab at tidying a couple of things up your ledge, and you’ll understand!
8. Ensure your trash area is sufficiently huge. Do you have a flood zone for your reusing? My present junk can is one of those waste and-reusing teams, yet the reusing part is far too little, and I much of the time end up putting a paper pack (or two) by my junk can for all my recyclables. This isn’t a perfect arrangement, as it influences the kitchen to look jumbled and I always need to move my way around the sacks!
9. Cooking Habits- With all cooking there comes cleaning, yet how much and for to what extent you need to clean relies upon your cooking propensities. These eight hints have the ability to change your cooking (and therefore, cleaning!) life.
After all the hard work that you did, it is time for you to use your kitchen as you please.